More images at the end!
Introduction
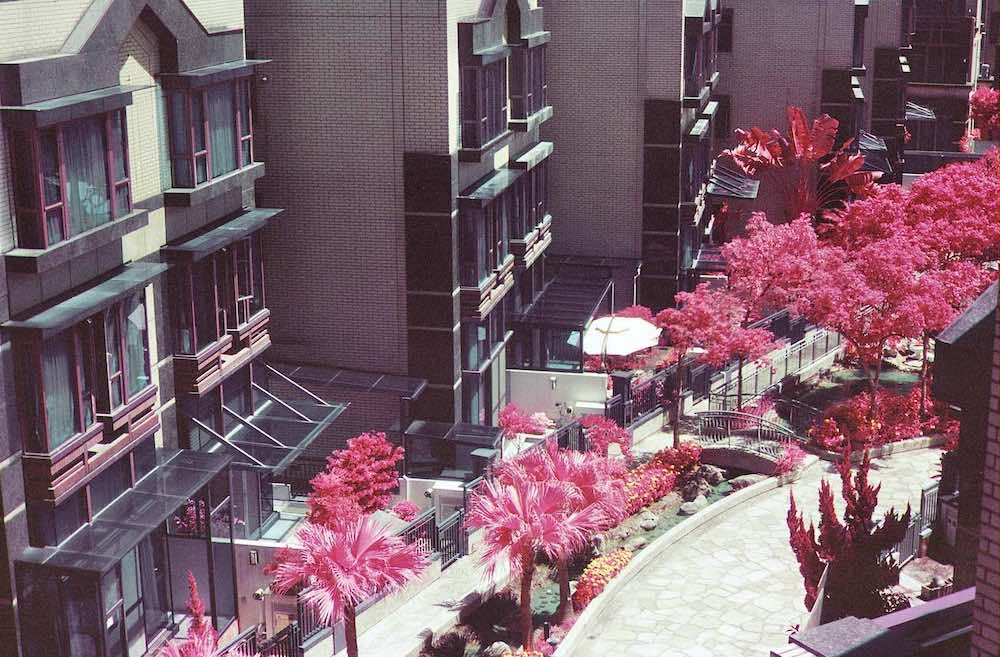
Originally created for the US military, Aerochrome is a color infrared film that turns trees and vegetation a vivid pink color while leaving everything else relatively unchanged – allowing surveillance planes to find buildings and camps camouflaged within the forest. However, after being discontinued over 10 years ago the film stock is sold out almost everywhere and next to impossible to buy.
I obviously wanted to shoot a roll of this elusive film but buying it online was out of the picture, so I did the next best thing: recreate it.
How Aerochrome Works
Before I could recreate it, I first had to figure out exactly how Aerochrome works. As someone who didn't even know how normal film worked, it took me a few days of reading over the Aerochrome datasheet before I kinda understood what was going on.
This most important thing you have to understand about Aerochrome is that it doesn't record red green & blue like a normal film stock does. Instead, it records infrared, red & green. However, this leads to the question of how to display the infrared information. We obviously can't see infrared light, so instead the film creates a "false color" image by displaying infrared as red, red as green, and green as blue.
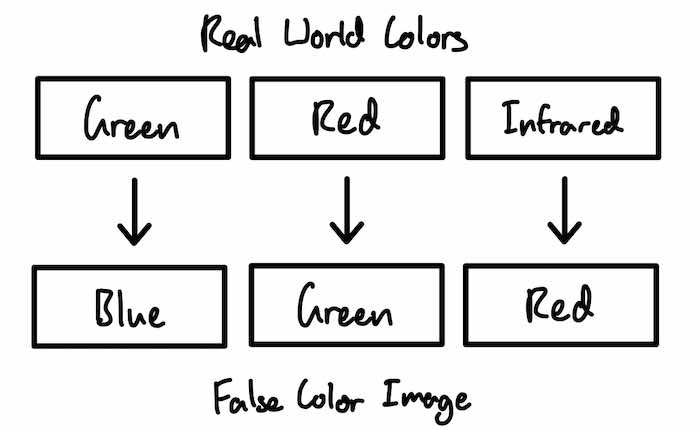
So why does Aerochrome turn trees pink then? This happens because trees have the rather unique characteristic of being very reflective of infrared light (ie. if you take a black & white infrared image of a tree, it would show up as bright white). Trees also reflect green light (trees are green remember), so therefore trees reflect green and IR. The green is converted to blue and the infrared is converted to red. If we mix blue and red, we get pink!
So How Do We Recreate It?
While color infrared film is no longer being made, black & white infrared film is still produced which is what makes all of this possible. By using a method called "trichrome photography", we can mimik color film by taking 3 black & white images.
Basic trichrome photography is pretty intuitive. You simply take three black and white photos: one with a red filter, one with a green filter and one with a blue filter. This gives you three images, each one representing the information for one color channel. In Photoshop you are then able to assign each B&W image to their corresponding color channel to create a full color image.
We can adapt this method to recreate Aerochrome. Instead of using red green & blue filters, we will use IR, red & green filters. It's a bit more complicated than this however. To accurately recreate Aerochrome you have to choose the right filters to match Aerochrome's "Spectral Sensitivity Graph". This graph basically just tells you which wavelengths (ie. colors) the film is sensitive to.
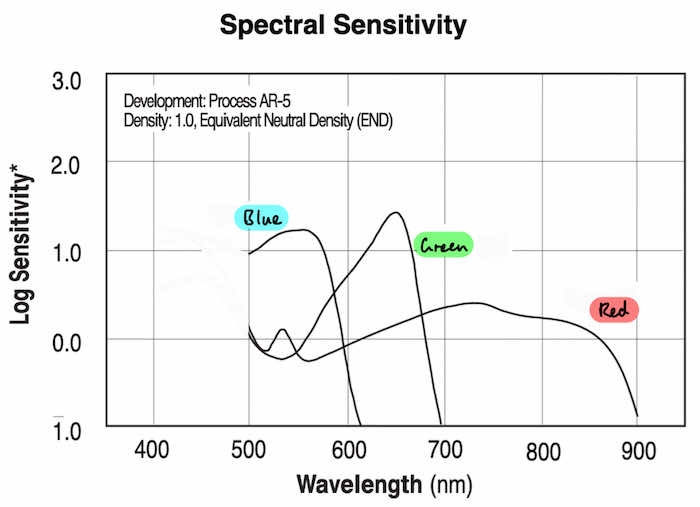
From this graph we can see that the blue color is sensitive from 500-600nm, green from 550-700nm and red from 600-900nm. Using common color filters, we can recreate these ranges.
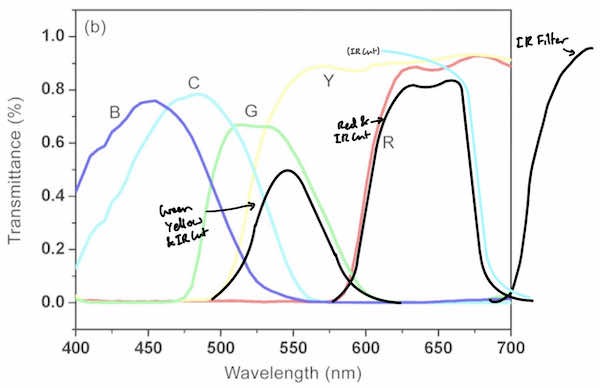
From the diagram above, we can see that:
- combining green, yellow & IR cut filters will give us 500–600nm (blue channel)
- combining red & IR cut filters gives us 600–700nm (green channel)
- using a 720nm IR filter gives us 720nm–∞ (red channel)
The filters don't need to be brand name or anything, I used the cheapest ones I could find on Aliexpress and it worked just fine. The color filters I used are from a cheap color filter set, the IR cut is from SVBONY and the 720nm IR filter is just an unbranded one from Aliexpress.
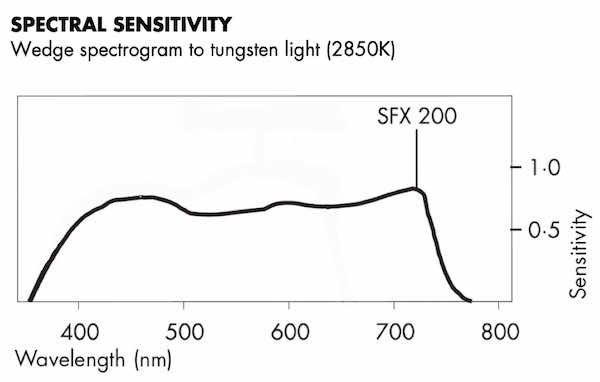
You might have noticed that my red channel starts at 720nm while Aerochrome's starts at 600nm. This is due to B&W IR film being much less sensitive to infrared light than Aerochrome. If you look at the spectral sensitivity graph of SFX 200 (the B&W IR film I used), you can see that its sensitivity ends at 770nm while Aerochrome ends at 900nm. Starting my red channel at 720nm is simply an attempt to compensate for SFX 200's much lower IR sensitivity (if I started at 600nm the infrared light would be drowned out by the other colors). The core idea between my method and Aerochrome is still the same however – we want the red channel to represent infrared light.
Steps to Recreate Aerochrome

Step 1: Take the photos
The first step is to take three photos with different filters so they each capture different parts of the color spectrum. The three filter sets are:
- green, yellow & IR cut
- red & IR cut
- 720nm IR
You must put your camera on a tripod to make sure the images line up with each other.
Step 2: Add the false colors
Edit the photos to their "false color". Remember that this isn't the real color of the images. For example, the first B&W image captures the green colors in the real world, but in our false color image it represents the blue channel. I use Affinity Photo's "Channel Mixer" to do this.
Step 3: Combine the images
Line up the images and combine them to create a full color image. I do this by setting the layer blend mode to "Add" in Affinity Photo. You should also probably do some additional curve adjustments to edit the photo and improve saturation, contrast, etc. And now you have a color infrared image!
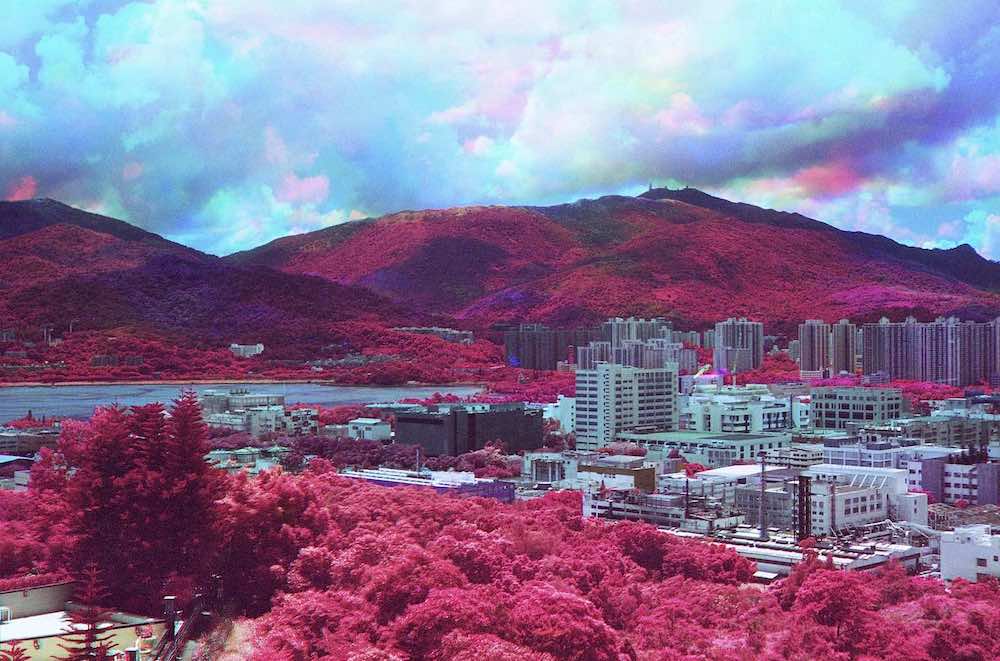
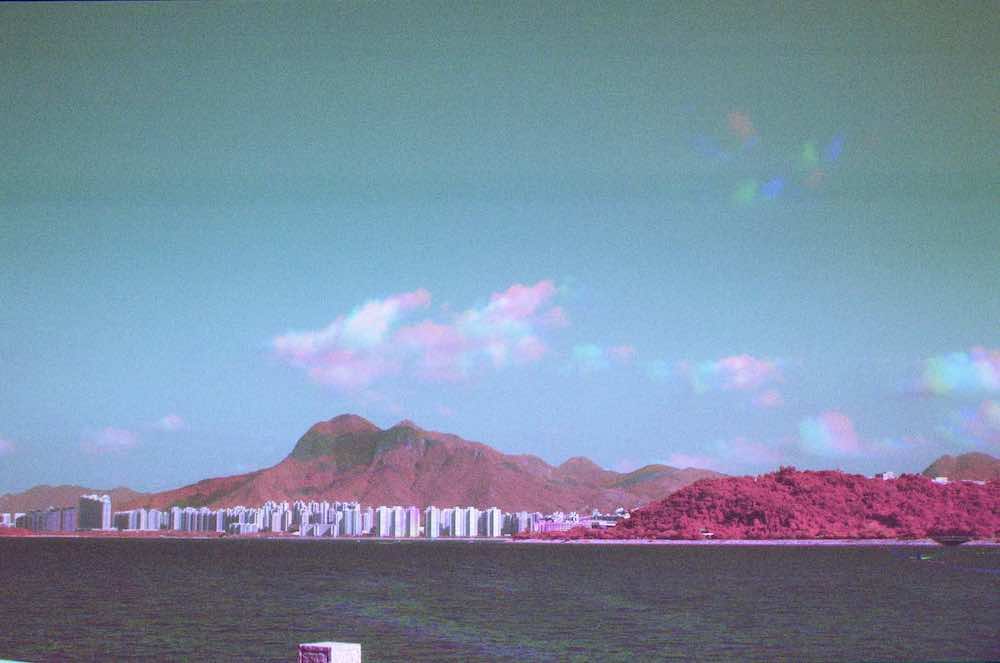
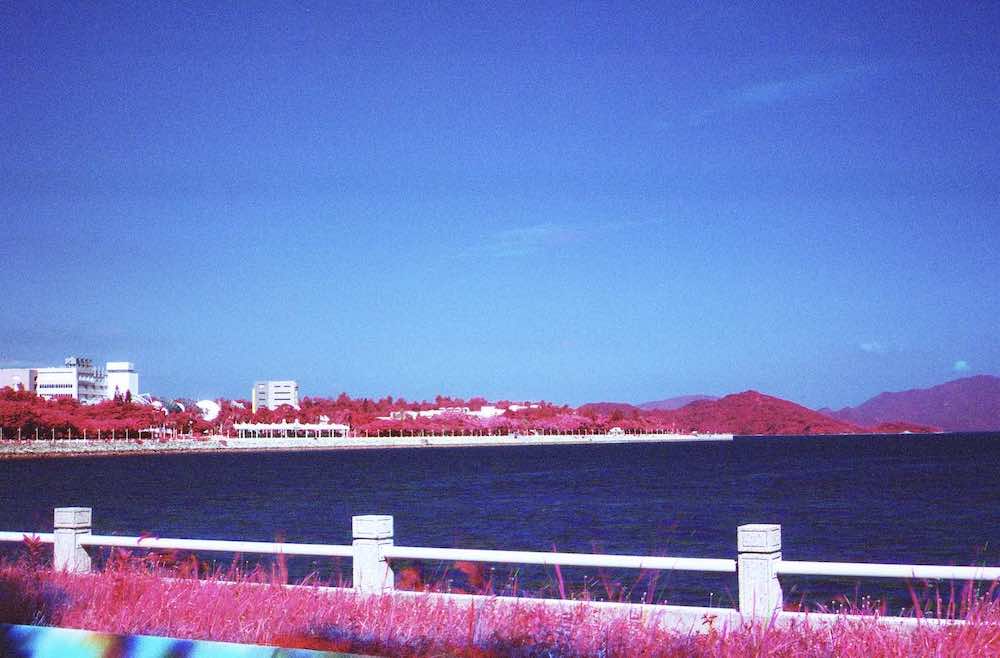
Example Images
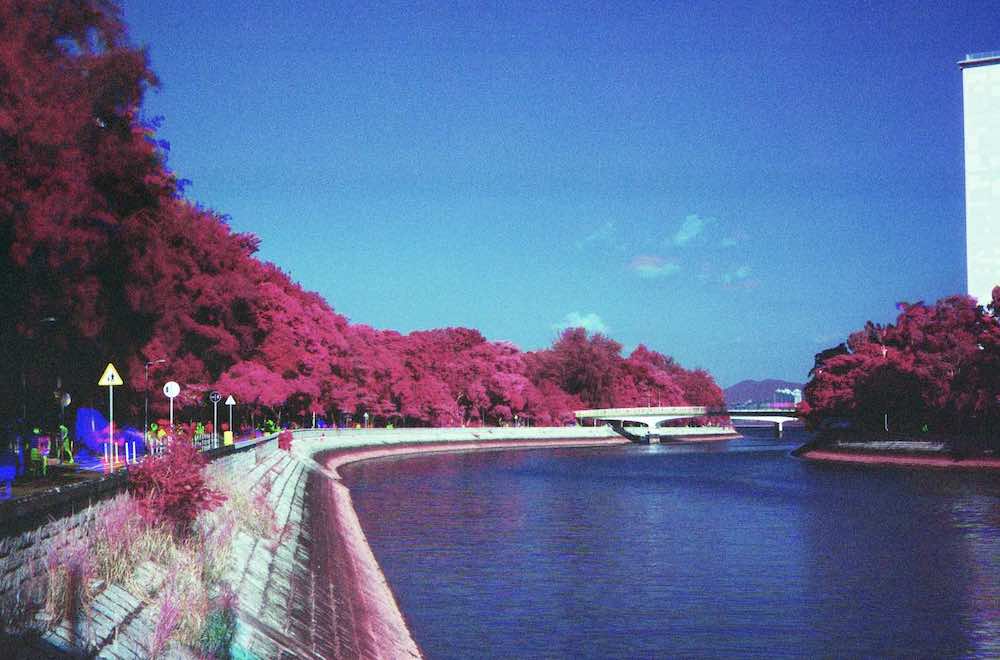
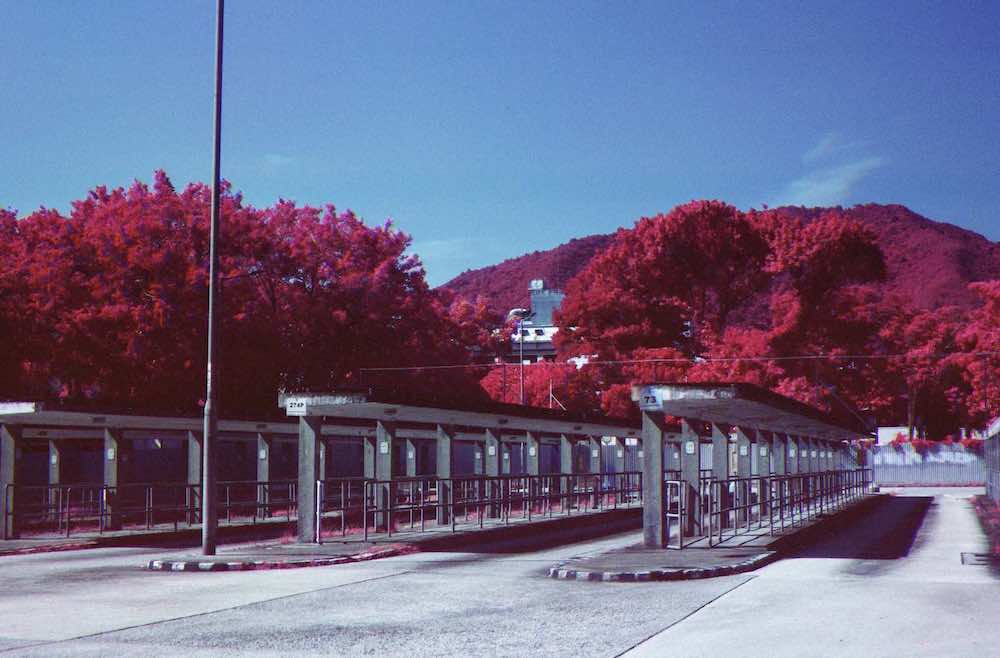
 View all the full resolution images here: https://imgur.com/a/I6dfX7i
(I didn't want to kill my server by hosting 15mb images myself)
Caveats
This method obviously isn't perfect. The main issue is that it's just kinda annoying having to set up a tripod and change out filters every time you want to take a photo. It does cause you to slow down and think about your shots more however, which is probably a good thing because you can only get 12 color images from one roll of B&W IR film. The three photo method also causes colorful artifacts if there are any moving objects (eg. cars, people, clouds, etc). You can see this in a few of the photos I took, but in my opinion it can look pretty cool.
I also had a lot of difficulty nailing the exposure for my IR photos. Most camera light meters aren't calibrated for the infrared wavelength, so a lot of my shots had exposure that were way off. Thankfully B&W negative film has an extremely forgiving exposure latitude so all of the shots were salvageable, albeit with quite a bit of added grain.
Another issue is that you have to shoot in direct sunlight since clouds block out infrared light. This is also a problem that Aerochrome had and is unavoidable unless you buy an infrared flash, which I might look into doing.
Conclusion
Even though there are other methods to recreate Aerochrome, I don't think any of them look as authentic as this method. Other film methods yield a strange orange color instead of bright pink and Lightroom presets cause ugly color fringing from messing with the colors too much. I only wish that there was a B&W IR film that is sensitive up to 900nm like Aerochrome was, but unfortunately they all have long been discontinued. I've only shot one roll of film using this method, but I'm excited to continue experimenting and refining it to get even better results.